Have done best to make sure files will work straight away, however if material error occurs
When menu pops up indicating error
Select browse - set new path (add path) - select folder containing materials
All materials were replaced with materials renamed in this file to make sure folder would work
File has then been tested
Only complication should occur from trying to find materials that are located on CD rather then drive C
Thursday 20 October 2011
Morphing
Remove turbosmooth from head geometry
Collapse head geometry to editable poly
Drage and copy - select 3

Turn off material for new heads
Name each head as an expression
Turn each head into corresponding impression

Add morpher modifier - to original head
Add turbosmooth after
Right click on slot - select heads from scene

Hide heads in another layer

Test emotions with morpher
Combine if wanted

STUBBLE (hair modified peice) WILL REQUIRE PROCESS TO BE ABLE TO ALIGN WITH FACE MOVEMENTS AS IT IS A SEPERATE PIECE OF GEOMETRY
Fixing eyes
Reference picture from modelling tutorial - used to help shape the eye + eye lids

Place in comparative position

Decided to recede Geometry above the eye

Reshape and work eye lids to follow contours of eye

Check with tubosmooth

Further correct geometry

Additions - eye lashes
Eye lashes
Create material in photoshop
Create wide canvas size
Use fade tool with brush
Create eye lashes by stroking up with variance

Select layer - press ctrl + i to invert
This will be used as opacity layer
Save as separate file

Create plane (approximate similar proportions) - Apply bitmap + opacity map - Move to eye


Add necessary amount of segments (approx 6) convert to editable poly
Curve Geometry around eye - pull length width the adjust eye brow length

Once fully formed
Copy geometry and place slightly above and behind

Create new set of material with bitmaps
Can highlight - drag holding shift to replicate
Adjust placement and offset for variance

Select rotate tool - highlight eye lash layers - hold shift - spin and create eye lashes for under eye

Edit and place accordingly

Mirror to create for opposite eye
(flip normals if necessary)

Wednesday 19 October 2011
Additions - hair
Since uvw map was created using face mode (polygons selection mode) when reverting back to editable poly mode the uvw map becomes warped

However if using any other mode the uvw map will remain same
Using edge selection mode select all polygon edges involving hair bitmap

Hold ctrl and convert to polygon mode (uvw map will probably scrabble but already found wanted geometry - uvw map will unscramble once out of this polygon mode) - detach geometry as clone - hide head - slightly scale down Geometry

Symmetry modifier - create hole hair piece - change material if required - adjust geometry if required

Add hair modifier

To help visualize renders added large plane behind head to contrast from black background

Many different things can be done to the hair to reach different desireed effect this is a quick overview of some noted features and settings
Hair count - how much hair your working with
Hair segments - how smooth hair is (if it bends will it bend over 3 segments or 30)
Hair passes - for rendering - how many times scanned over for rendering quality (makes BIG difference)

Material settings - hair colour / texture etc - find very light dependant if specular is not damitically reduced - in experiance always comes up lighter then tone set

Frizz parameters - can alter appearance drastically - simply how frizzy the hair appears (how much hair disperses

Dynamics - allows you to see live visualisation of hair movement with different settings etc - used for animation

Display - allows change settings for how hair is veiwed in viewport - mainly for building hair

Styling tools - allows you to directly manipulate hair freely using different brush settings - changing legth by scaling length or cutting - brushing in different directions etc etc
manipulate hair with style tools after turning style mode on

Long time later get general shape coorrect

More time later make looking more natural (guide lines highlighted yellow)

REPEAT USING DIFFERNET SETTINGS FOR STUBBLE
Tuesday 18 October 2011
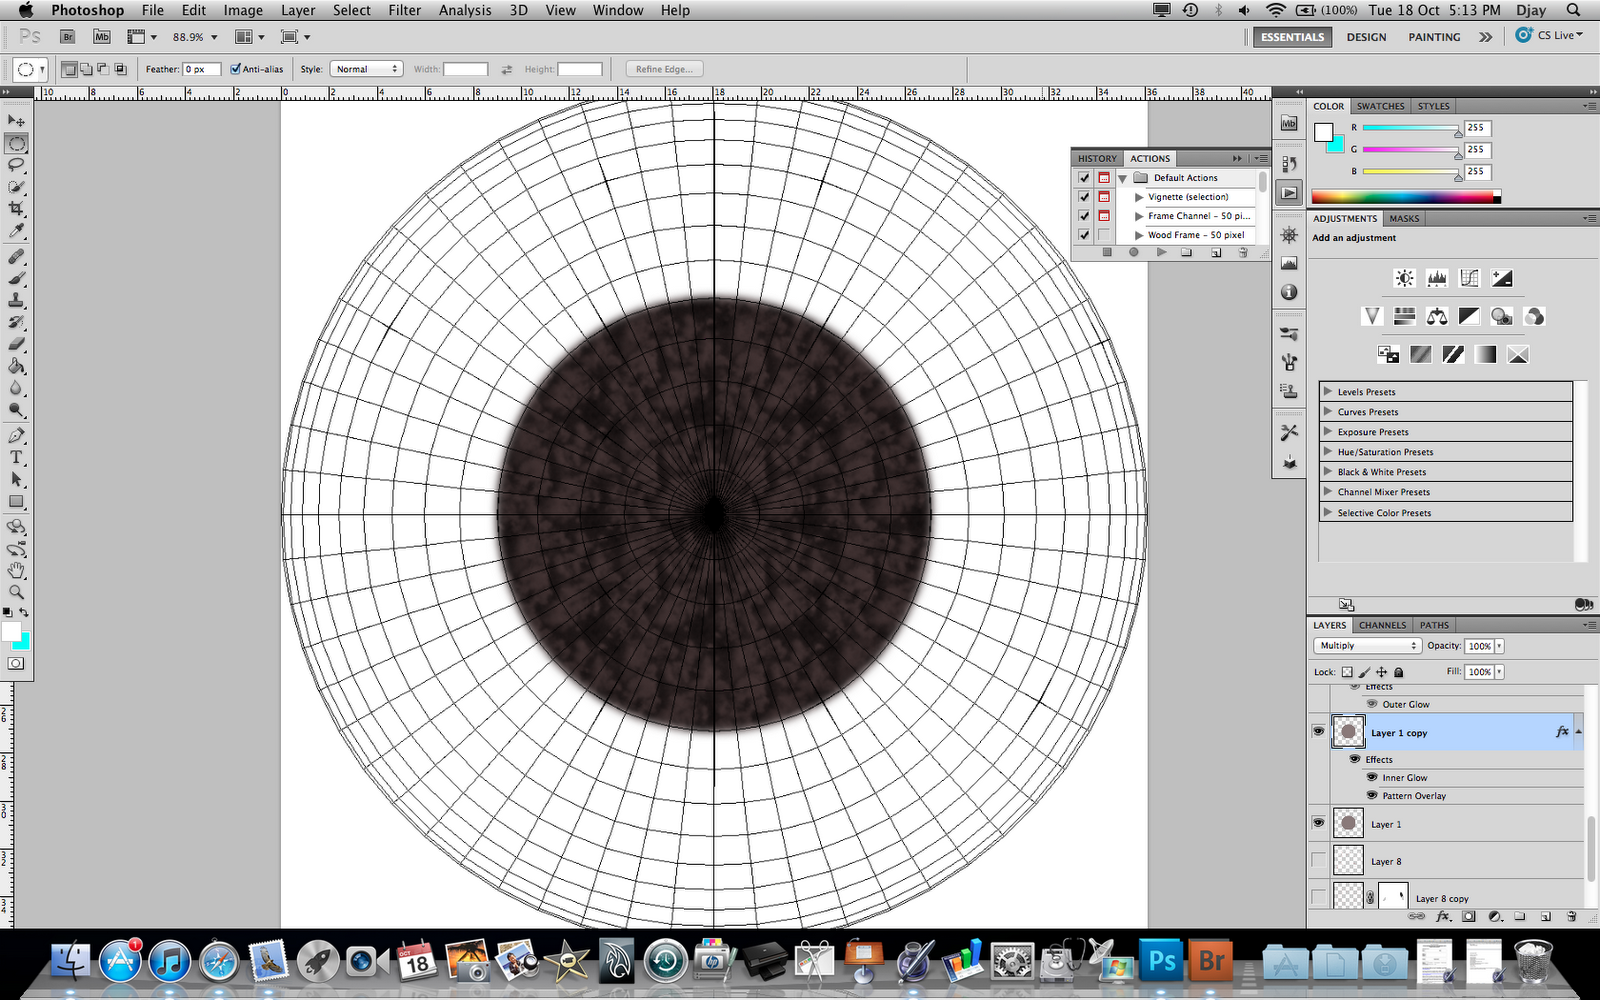
Additions - Eye ball
Create sphere
Edit sphere segment amount to 60

UVW unwrap - ignore backfacing - top view - highlight all - planar map
Had to use 3ds max 2012 to complete due to even more errors occuring in 3ds max 2011

Render out

Import render into photoshop
Ctrl + I = invert selection
Name uv
Change to multilpy mode (make white ares see through)
lower opacity if necessary

create new layer below
create circle markey from centre
drag out circle holding both alt + shift keys
alt = radius from centre of click
shift = proportions
Drawing circle to distance of where geometry was flipped before for eye main details - 5 polygon radius

Create white background layer for visual assistance if necessary
Edit fill - colour (your choice)
Filter - blur gaussian blur

fx - pattern overlay

Select desired pattern and apply

to recover colour info - duplicate layer
layer below - remove pattern - turn upper layer to multiply
Turn upper layer pattern (in fx menu) to multiply
fx - inner glow (normal mode)

Create new layer
Circle markey
draw halfway
Fill - any colour
eraser tool - dig into edges - idea is to make shape irregular

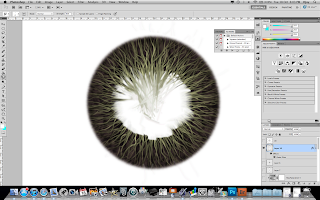
filter blur - radial blur

 \
\
Add outer glow so win striations overlap they are still visible - outer glow will also slightly cover lines behind giving artificial depth

first layer finished (after very long time)

When drawing these lines you will smudge far beyond boarder of eye detail
Select earlier circle layer ctrl click to select / highlight
Add layer mask to working layer to fix overlaps

Select hue + saturation modifier
Turned off layer mask in this screen shot ignore)

HOLD ALT KEY TO ADD OPTION TO FIX THIS TO SINGLE LAYER NOT HOLD PIC
Turned off layer mask in this screen shot ignore)

Choose colour

New layer
Draw circle market (slightly smaller then previous so sits inside) - fill - Outer glow modifier
BEGIN SMUDGING - slightly smaller brush
Trim edges
picture jumps ahead

Add hue/saturation as before
Make very dark

Drop opacity to 40%

Repeat third time BUT WITH DIFFERENCE
Since this is top layer - want to give illusion lines are going in and out not just in too out
When on smudging stage smudge in lots - add variety to striations
Add bevel and emboss to adjust finish - depth and roundness finish (probably not noticeable at this size though)

then smudge out slightly smaller brush
trim edge

Hue and saturation

New layer - circular markey
fill - black

Smudge all round edges in and out to soften and add irregularity
very big - increase brush size
very weak - lower strength

New layer
Circle market half way through iris
Edit - stroke
white - set width to be approx as shown

Add gaussian blur

change to overlay

Showing overlay


white part of eye in eye not pure white
lots of veins and slight discolouration
Create new layer under completed iris
Select medium red colour
Brush opacity 100%
Brush settings - shape dynamics - fade
Set width and distance

Try drawing random patterns from centre and other points
Add irregularities in veins not straight lines

Duplicate vein layer
Place underneath
Gaussian blur
Add mask on top vein layer
Low opacity erase - so not all veins are uniform in strength of thickness and colour

Eye discolouration
New layer behind veins
Very large brush - slight noise pattern (turn off fade)
Brush pattern with angle jitter + scattering
i.e. trying to make very large random patterns at very low opacity just to break up white surface

Background lightly dusted finish
Yellow + red used

Fit this example instead of simply feeding material back onto original sphere size restrictions required adjustments as follows
Create sphere
UVW mapping - this allows for easier placement and direct size adjustment


Grow to specified number - ie whatever iris covers

Detach - rotate 180 - move back into position

Attach - highlight an edgefrom each piece in edge selection mode - loop select - hold ctrl + turn into vertex mode - select weld

Weld back together


Edit sphere segment amount to 60

UVW unwrap - ignore backfacing - top view - highlight all - planar map
Had to use 3ds max 2012 to complete due to even more errors occuring in 3ds max 2011

Render out

Import render into photoshop
Ctrl + I = invert selection
Name uv
Change to multilpy mode (make white ares see through)
lower opacity if necessary

create new layer below
create circle markey from centre
drag out circle holding both alt + shift keys
alt = radius from centre of click
shift = proportions
Drawing circle to distance of where geometry was flipped before for eye main details - 5 polygon radius

Create white background layer for visual assistance if necessary
Edit fill - colour (your choice)
Filter - blur gaussian blur

fx - pattern overlay

Select desired pattern and apply

to recover colour info - duplicate layer
layer below - remove pattern - turn upper layer to multiply
Turn upper layer pattern (in fx menu) to multiply
fx - inner glow (normal mode)
Create new layer
Circle markey
draw halfway
Fill - any colour
eraser tool - dig into edges - idea is to make shape irregular

filter blur - radial blur

Smudge tool
Brush size for thickness
Strength of length
Push out from middle to create striations

Add outer glow so win striations overlap they are still visible - outer glow will also slightly cover lines behind giving artificial depth

first layer finished (after very long time)

When drawing these lines you will smudge far beyond boarder of eye detail
Select earlier circle layer ctrl click to select / highlight
Add layer mask to working layer to fix overlaps

Select hue + saturation modifier
Turned off layer mask in this screen shot ignore)

HOLD ALT KEY TO ADD OPTION TO FIX THIS TO SINGLE LAYER NOT HOLD PIC
Turned off layer mask in this screen shot ignore)

Choose colour

New layer
Draw circle market (slightly smaller then previous so sits inside) - fill - Outer glow modifier
BEGIN SMUDGING - slightly smaller brush
Trim edges
picture jumps ahead

Add hue/saturation as before
Make very dark

Drop opacity to 40%

Repeat third time BUT WITH DIFFERENCE
Since this is top layer - want to give illusion lines are going in and out not just in too out
When on smudging stage smudge in lots - add variety to striations

Add bevel and emboss to adjust finish - depth and roundness finish (probably not noticeable at this size though)

then smudge out slightly smaller brush
trim edge

Hue and saturation

New layer - circular markey
fill - black

Smudge all round edges in and out to soften and add irregularity
very big - increase brush size
very weak - lower strength

New layer
Circle market half way through iris
Edit - stroke
white - set width to be approx as shown

Add gaussian blur

change to overlay

Showing overlay

Adjusted and made a lot more subtle and natural
(reduced thickness of line and added more blur

white part of eye in eye not pure white
lots of veins and slight discolouration
Create new layer under completed iris
Select medium red colour
Brush opacity 100%
Brush settings - shape dynamics - fade
Set width and distance

Try drawing random patterns from centre and other points
Add irregularities in veins not straight lines

Duplicate vein layer
Place underneath
Gaussian blur
Add mask on top vein layer
Low opacity erase - so not all veins are uniform in strength of thickness and colour

Eye discolouration
New layer behind veins
Very large brush - slight noise pattern (turn off fade)
Brush pattern with angle jitter + scattering
i.e. trying to make very large random patterns at very low opacity just to break up white surface

Background lightly dusted finish
Yellow + red used

Fit this example instead of simply feeding material back onto original sphere size restrictions required adjustments as follows
Create sphere
UVW mapping - this allows for easier placement and direct size adjustment

Once new size is found
Take not of amount of geometry iris covers (adjust size to fit specific number if possible)
Select end geometry

Grow to specified number - ie whatever iris covers

Detach - rotate 180 - move back into position

Attach - highlight an edgefrom each piece in edge selection mode - loop select - hold ctrl + turn into vertex mode - select weld

Weld back together

reapply material if material was turned off

Subscribe to:
Posts (Atom)